
When deploying WireGuard VPN endpoints on Raspberry Pis at the various networks I need to access remotely, I needed a Dynamic DNS / DDNS solution to ensure I could reliably access these endpoints even if ISPs issued new WAN IP addresses. I stumbled across this excellent tutorial on letswp.io about using Cloudflare for a DDNS back-end; while it covered most of what I needed, I was a bit leery about exposing my Cloudflare Global API key to a script. So, I adapted their solution to use an API token instead. This should work on any *Nix-based machine, not just RPis.
You can find the full tutorial below, or get started right away by cloning the associated GitHub repo.
Prerequisites
Before executing any steps below, you will need the following:
- A domain name that you own using cloudflare for DNS resolution (see this guide for a quick how-to)
- A Raspberry Pi or other machine that will serve as the destination for any DDNS traffic. I use a Raspberry Pi 4 Model B, but there are numerous hardware variations that will work
Getting Started
You’ll want to create a directory where the script will be saved. You can place the script in any directory; this tutorial will assume you use /opt/cloudflare-ddns/ as the root directory for the script and files. If you wish to use this directory, you can run the following commands as a user with sudo permissions (replace nick with your username):
cd /opt
sudo mkdir cloudflare-ddns
sudo chown nick:nick cloudflare-ddns
You’ll also need to download the script itself; the easiest way to do this is to clone the GitHub repo associated with this tutorial (note: instructions assume you use GitHub over SSH). You will also need to make the script executable.
git clone [email protected]:nperanzi/cloudflare-ddns.git
chmod +x cloudflare-ddns/cloudflare-ddns.sh
Create DNS records and API Token
Select a subdomain you wish to use to reach your server. For this tutorial, I will use vpn.yourdomain.com as the subdomain; in all code, replace this with your actual subdomain.
Create a DNS record for your subdomain
- On your Cloudflare Dashboard, select the domain under which the subdomain will reside. In our example, you would select
yourdomain.com - Click on the DNS icon, which should bring you to the DNS Management page
- If you do not already have an “A” record for
vpn.yourdomain.com, create one now:- Click Add Record
- Set Type to “A”, Name to
vpn(or whatever you have chosen as your subdomain), IPv4 Address to anything (e.g.,123.456.789.10), and TTL to Auto - Click the orange cloud under Proxy Status; your record should now look like this:

- Click Save
Create an API Token
We’ll create an API token that only has access to edit DNS records for this site; this helps ensure you are using the least-permissive API token for this task and provides some protection if the token is compromised.
- Return to the Cloudflare dashboard
- Click the dopdown under My Profile, then click My Profile
- Click the API tokens tab
- Click the Create Token button
- Click Get Started, then fill out the following fields:
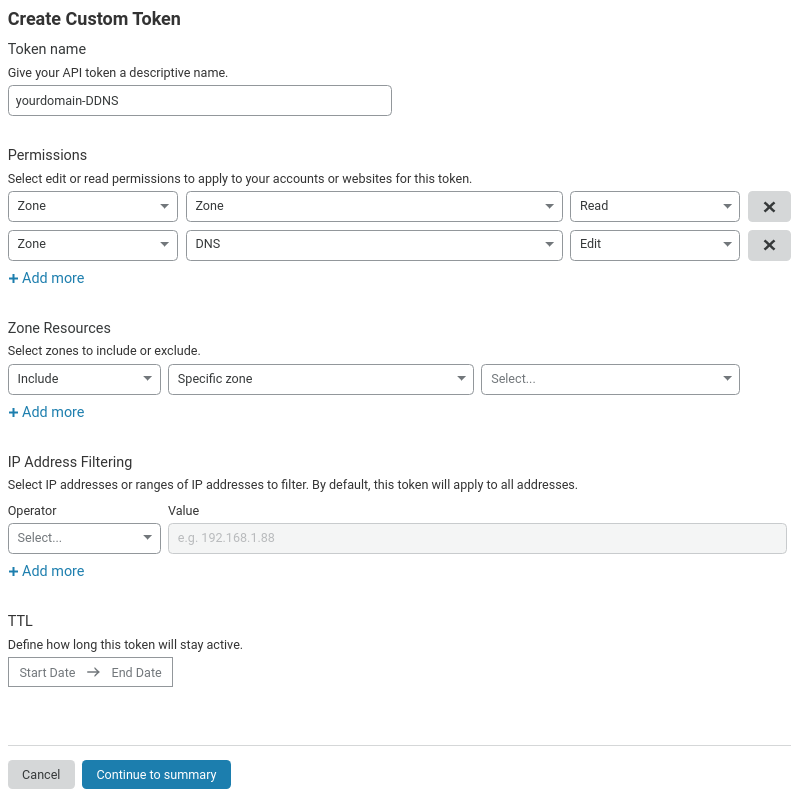
- Token name:
yourdomain-DDNS - Permissions: Zone -> Zone -> Read and Zone -> DNS -> Edit
- Zone Resources: Include -> Specific Zone -> yourdomain.com
- Token name:
- Make sure all settings match below (with yourdomain.com selected under Zone Resources), then click Continue to summary.
- Click Create Token
- Copy the API token and change
paste-api-token-hereon line 9 ofcloudflare-ddns.shto your API token
Change the other script parameters
Zone ID
You’ll need to get the id that Cloudflare assigns to your domain and pass this parameter to the script. Fortunately, this is pretty straightforward:
- Return to the Cloudflare dashboard
- Select the domain you’re using for DDNS (e.g.,
yourdomain.com) - Scroll down to the API section and you should see a link for Zone ID; copy this alphanumeric string (either directly or by clicking
Click to copy) and changepaste-zone-id-hereon line 10 ofcloudflare-ddns.shto your Zone ID
Record Name
Change vpn.yourdomain.com on line 11 of cloudflare-ddns.sh to your desired subdomain
Run the script
First, verify that all three setup parameters have been updated. Lines 9-11 of cloudflare-ddns.sh should NOT look like this anymore:
auth_token="paste-api-token-here"
zone_id="paste-zone-id-here"
record_name="vpn.yourdomain.com"
For example, these lines could look like:
auth_token="gnR31pakO-yzKXuyOZfNhq-ptIviqUTWm2Ux4uLb"
zone_id="4adfa8d58a9c23e82edb1192f2a4c2d5"
record_name="vpn.myawesomedomain.io"
If all paramters have been updated, run the script: ./cloudflare-ddns/cloudflare-ddns.sh; if all goes well, you will see output like:
IP changed to: 123.456.789.10
Check the DNS record for vpn.yourdomain.com on Cloudflare; the “A” record for vpn should now show your server IP under Content.
Note: running the script again should produce no output to the console, because the IP is only updated when it differs from the current machine’s IP. This is normal.
Set up cron to run the script at regular intervals
Once the script runs as planned and updates the IP correctly, you’ll want to automate this so you don’t have to manually run it each time your IP changes. Create a new cron job to run this automatically by running the below command in the terminal:
crontab -e
Add a new line that looks something like the below:
0 */6 * * * /bin/bash /opt/cloudflare-ddns/cloudflare-ddns.sh
The exact line above will run the script every 6 hours; if you’d like to customize this, check out this tutorial on cron.
That it! You now have dynamic DNS set up through Cloudflare, with no need to manually update your server’s public IP.